Guide for Mercury Network's Integration with Encompass
If you're using Encompass, you can leverage the nation's most powerful platform for compliant appraisal management — Mercury Network. By keeping data synchronized between Mercury and Encompass, you'll avoid re-keying data to save time and reduce errors. See all the data shared between Encompass and Mercury.
To use the integration, you'll need a Mercury Network account with a VMP XSite. It's free and easy to set up, so call 1‑800‑434‑7260 to get everything you need.
When you're ready, your Encompass Admin user will need to configure a few settings, so start with the "Configure Encompass" tab below.
You can see a video guide of the ordering process here.
Use the tabs below to find the information you need.
Configure Encompass
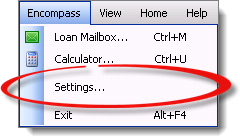
- First, click the Encompass menu item, then choose Settings… from the dropdown.
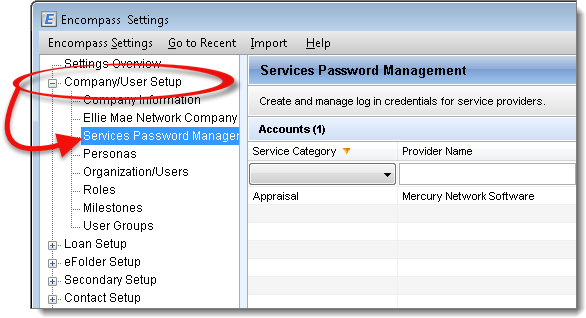
- Click to expand Company/User Setup, then choose Services Password Management from the list below.
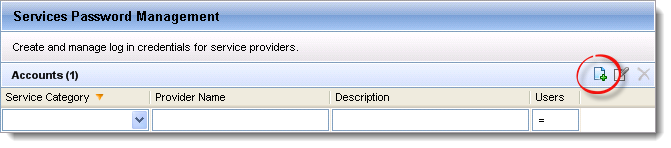
- In the Services Password Management screen, click the (
 ) icon to add a new password setting.
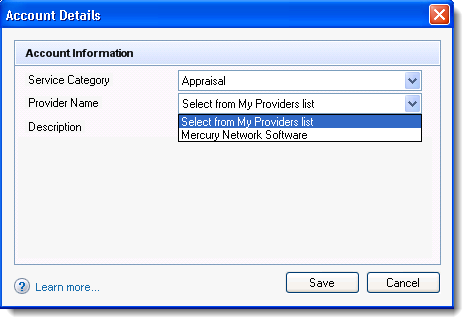
- In the new Account Details screen, choose Appraisal from the Service Category dropdown, then select Mercury Network Software from the Provider Name dropdown.
- Once you've selected Mercury Network Software from the Provider Name dropdown, additional fields will be visible to enter a default Username, Password, and the Network ID. The Username & Password will be the same credentials you use for your VMP XSite. To get your Network ID, contact integrationsupport@mercuryvmp.com.
- Finally, select which users should receive these credentials and settings.
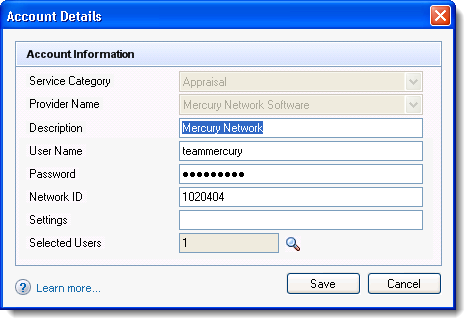
After entering information into these fields, click Save to complete the configuration.
Configure which fields in the order will be imported into Encompass
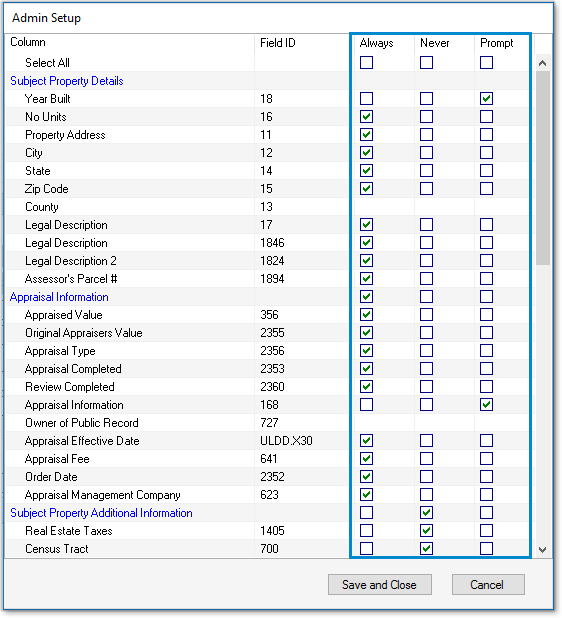
When orders are being imported into Encompass, by default, your users will be prompted to select which fields will be brought from the Mercury Network order into Encompass on a per-order basis. However, as an Admin or Super Admin user, you can configure this beforehand so that each field will be imported based on your global settings, which saves time for your users and provides greater consistency. Here's how you can select what will be done with each field in the Mercury Network order when it's imported into Encompass:
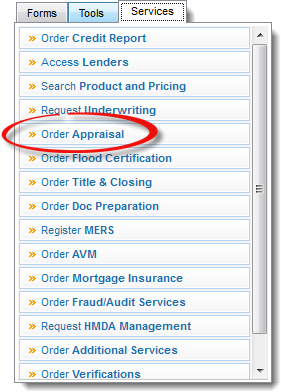
- In Encompass, proceed as if you intend to order an appraisal: With a loan file open, click the Services tab, then choose Order Appraisal, select Mercury Network and enter your login information if prompted.
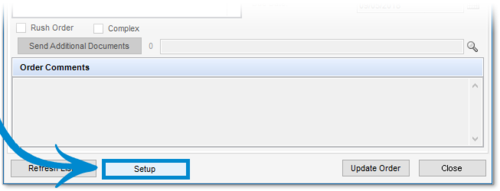
- In the Mercury Network Software dialog, click Setup at the bottom. This button only appears if you're an Admin or Super Admin user.
- In the Admin Setup dialog that appears, you can use the check boxes in the columns on the right to select what happens for each field in the order. Here's what the selections mean:
- Always
— If available, data from the appraisal report or Mercury order will always be imported into this field.
— Fields set to Always will be checked by default in the import dialog. They’ll also be grayed out to indicate they can’t be changed. - Never
— Data from the appraisal report or Mercury order will never be imported into this field.
— Fields set to Never will not be displayed in the import dialog. - Prompt
— If available, data from the appraisal report or Mercury order will prompt the user to select on a case-by-case basis – exactly how it works today.
— Fields set to Prompt will be displayed in the import dialog and will be checked by default. The user can uncheck a field to prevent that value from being imported from Mercury Network.
— All rules are set to Prompt by default.
Order an appraisal
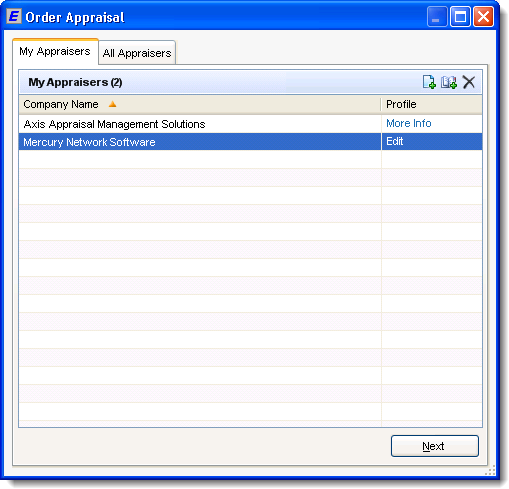
- With a loan file opened, click the Services tab in the lower-left corner, then click Order Appraisal.
- From the My Appraisers list, select Mercury Network Software and click Next. If Mercury Network Software is not listed in your My Appraisers list, click on the All Appraisers tab and search for Mercury Network Software, then click Add to My Appraisers.
- In the next screen, if it's the first time, enter your username, password, and the Network ID will automatically appear. Then, click the box to Save Login Information. After entering the username, password, click the Refresh Lists button to populate the list of available products and the dropdown boxes on the right. These values will automatically populate in the future as long as the Save Login Information box was checked.
NOTE:
If the Network ID doesn't appear automatically, contact the Admin in your organization to complete your account setup.
Tabs
To order an appraisal, there are 4 tabs that you will enter information into: Order, Loan/Property, Contacts, and Payment.
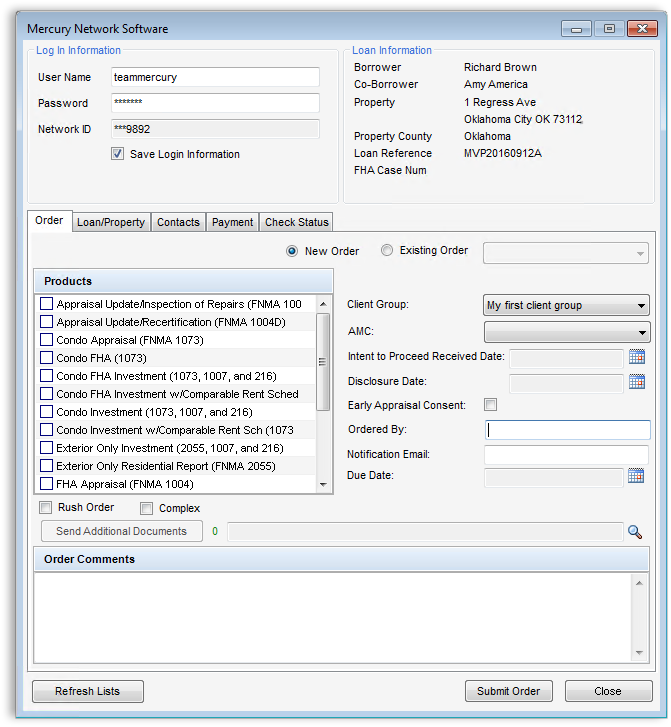
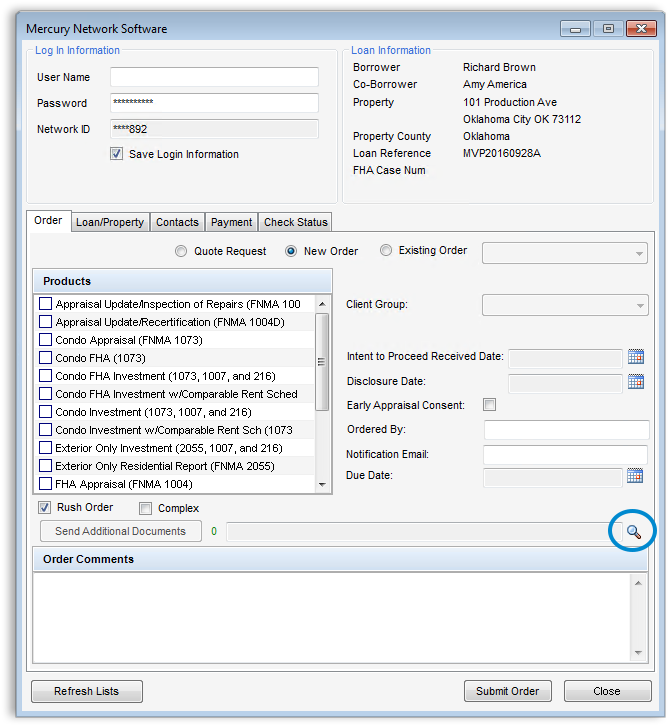
Order Tab
This is the default tab and it will contain information pre-populated from Encompass in the upper right, and a section for user-selectable fields down below.
On a new loan, the New Order radio button will be selected by default. If an order has already been placed for the loan, it will default to Existing Order and choosing New Order will allow you to place a second appraisal order.
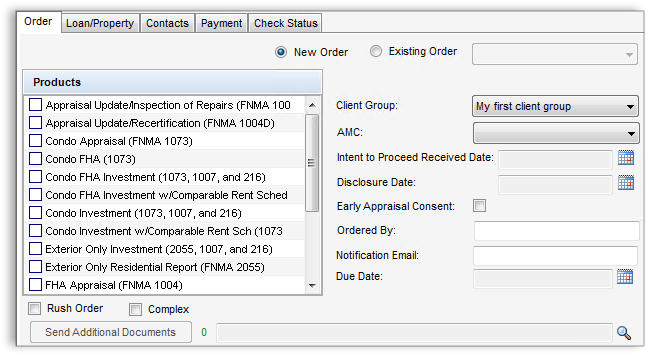
- The Products list shown is based on the authenticated user and the selected Client Group.
- The Client Group field will populate based on the Client Groups that you are assigned to. If you are not assigned any Client Groups, this field will not be available.
- The AMC field will allow you to select an AMC for the assignment. This field will appear based on your VMP XSite order form settings.
- Click the calendar icon to select the Intent to Proceed Received Date.
- Click the calendar icon to select the Disclosure Date.
- Check the box for Early Appraisal Consent if applicable. This will allow the order to be placed before the Intent to Proceed Date is known.
- Enter a name in the Ordered By field.
- In the Notification Email field, enter an email address which should receive order notifications. You can enter multiple addresses separated by a semi-colon.
- Check the boxes for Rush Order and/or Complex if applicable.
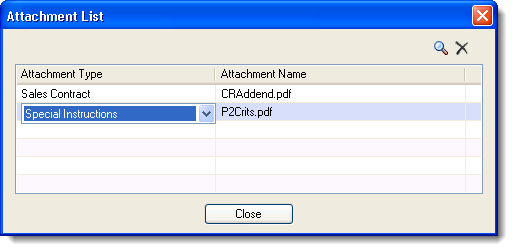
- If you need to send any documents, such as a sales contract, this can be done by clicking the magnifying glass to the right of the Send Additional Documents button.
Loan/Property Tab
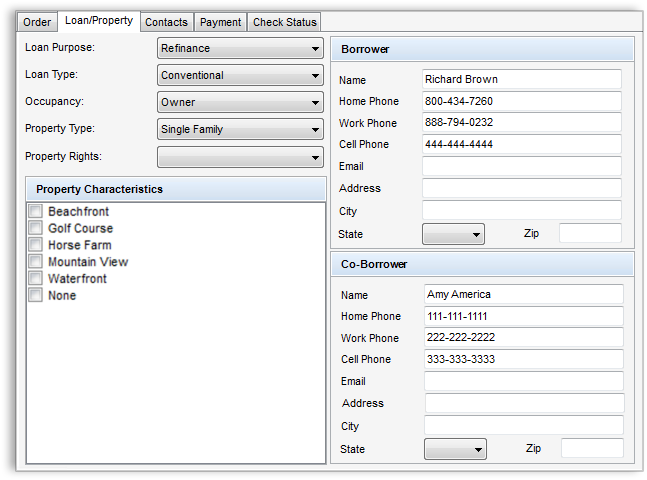
- The Loan Purpose field will populate based on your VMP XSite's order form.
- The Loan Type field will populate based on your VMP XSite's settings.
- The Occupancy field is populated based on the values from the VMP XSite.
- The Property Type field is populated based on order form settings.
- The Property Rights field is populated based on order form settings.
- Check any Property Characteristics that apply. The available characteristics are populated based on your order form settings.
- The Borrower and Co-Borrower fields are pre-populated from information in the Encompass loan file.
Contacts Tab
This screen contains fields for contact information that will be sent to the vendor.
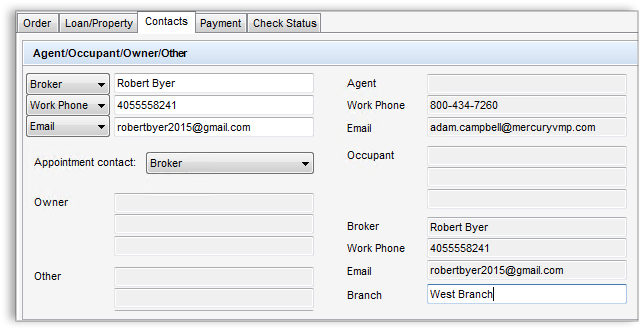
- The Agent/Occupant/Owner/Other section will allow you to include additional contact information that should be sent to the vendor. Use the first drop-down to indicate the role of the contact, then enter their contact information in the fields provided.
- The Appointment Contact drop-down will allow you to select which contact should be used to schedule an appointment. The options available are Borrower, Co-Borrower, Agent, Occupant, Owner, or Other.
- If the contact is associated with a specific branch, enter that information in the Branch field.
Payment Tab
In this tab, select a Payment Type from the dropdown. For Credit Card and CC to Vendor, you will enter the additional information needed, which will be sent to the vendor.
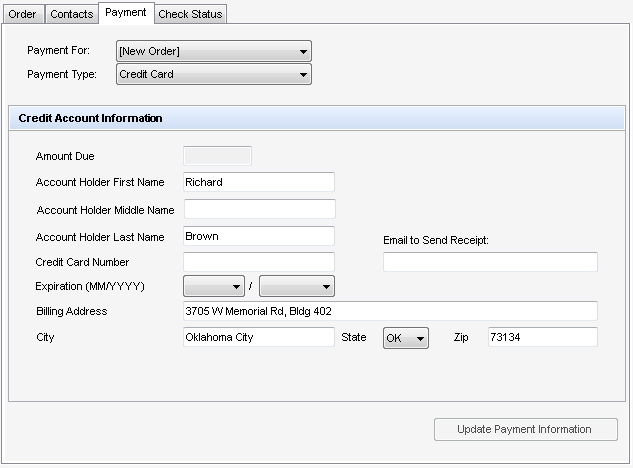
- The Payment For dropdown will default to [New Order] when placing an initial order for a loan. If an order has already been placed, this field will show the TrackingID of that order. This will allow you to submit updated payment information.
- The Payment Type dropdown will populate based on the authenticated user and selected Client Group. If you are not assigned to any Client Groups, it will be based on the assigned or default fee table.
- The value for the Amount Due field is returned once an order has been submitted. This value is determined by your Mercury Network account setup.
- If viewing the Payment tab on an existing order, the Update Payment Information button will allow you to send updated credit card information to the vendor.
Once you have finished entering the order information on each tab, you will click Submit Order. Confirm the updated fields, then once submitted, the order will be In progress and will be automatically assigned to the vendor.
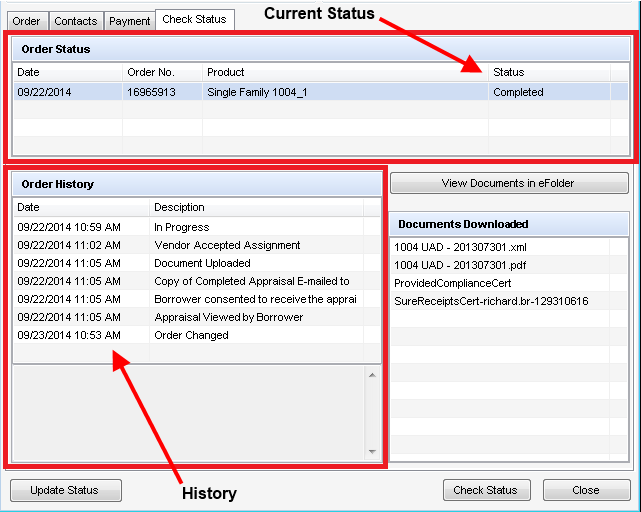
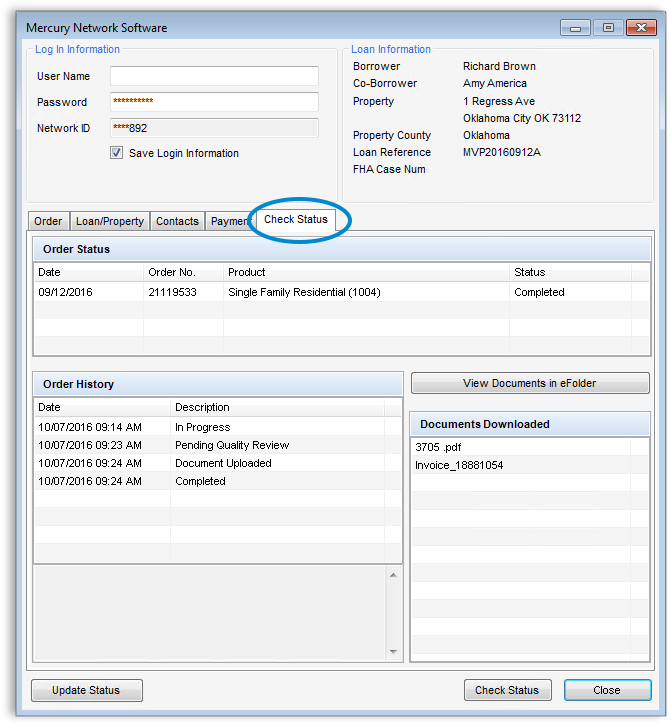
Check status
There are two ways to check the status of your order.
The first approach involves going through the Order Appraisal interface to access the Check Status screen.
- With a loan file open, click the Services tab in the lower left, and then click Order Appraisal.
- In the new screen, click the Check Status tab, which will automatically pull in the latest changes to the history of the order, as well as any available documents.
- To manually check for a new status, click the Check Status button.
The second approach to checking the status of an order is to click on the paper icon with a timer on it in the Services Tab to check the status of the appraisal order for that loan.
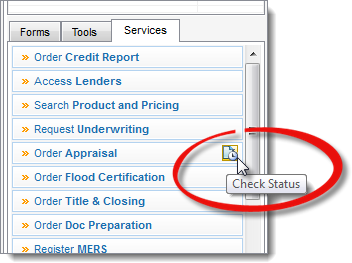
This will open the Encompass Appraisal Order Status window listing the Appraisal orders that have been placed for that loan. Click on the Retrieve hyperlink to retrieve the status of the selected order, or click on the View hyperlink to retrieve the attachments of the selected order if the order has already been completed. Encompass will retrieve the status of the order for you.
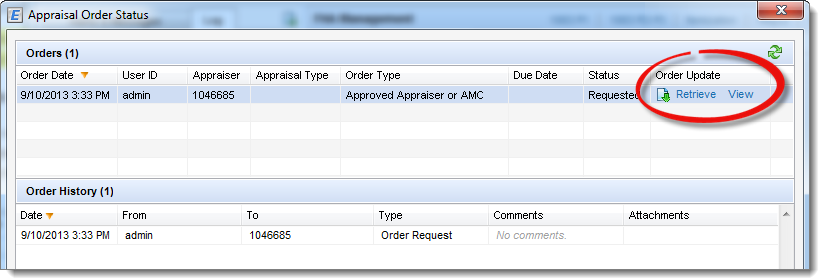
Note:You'll only be allowed to check the status of the order that was selected in the Order list.
The following statuses should be available in the Order History section:
- Vendor Accepted Assignment
- Order Assigned
- Inspection Scheduled
- Inspection Completed
- Completed
- Revision Needed
Update status
Once an order has been placed, you can send various statuses or messages from within the Order Appraisal screen.
- With a loan file open, click the Services tab in the lower-left, and then click Order Appraisal.
- Once you've selected Mercury Network Software, click Next, and then click the Check Status tab, which will automatically pull in the appraisal and supporting documents.
- Click Update Status in the lower-left.
- In window that appears, you will select the status that you want to send, then enter any comments into the Status Comment box.
- Click Update, then confirm the updated fields in the dialog that appears. This will send the status and comments to the vendor. A confirmation screen will be displayed showing the current status of the order.
Send docs
In addition to including documents when placing an order, you can also send documents on existing orders from within the Order Appraisal screen.
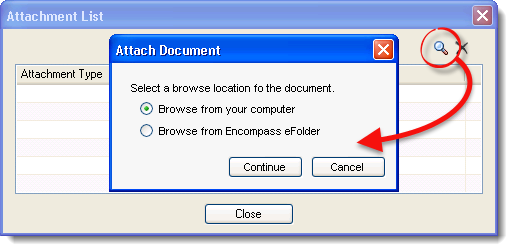
- With an existing order selected, click the magnifying glass in the lower-right corner of the Order Appraisal screen.
- A new window will open that will display any documents that are going to be uploaded. Click the magnifying glass in this new screen to choose files from the eFolder or from your local computer.
- After selecting one or more documents to upload, you can set the type of document that is being uploaded for each one.
Click Close at the bottom, and then click the Send Additional Documents button to upload these documents.
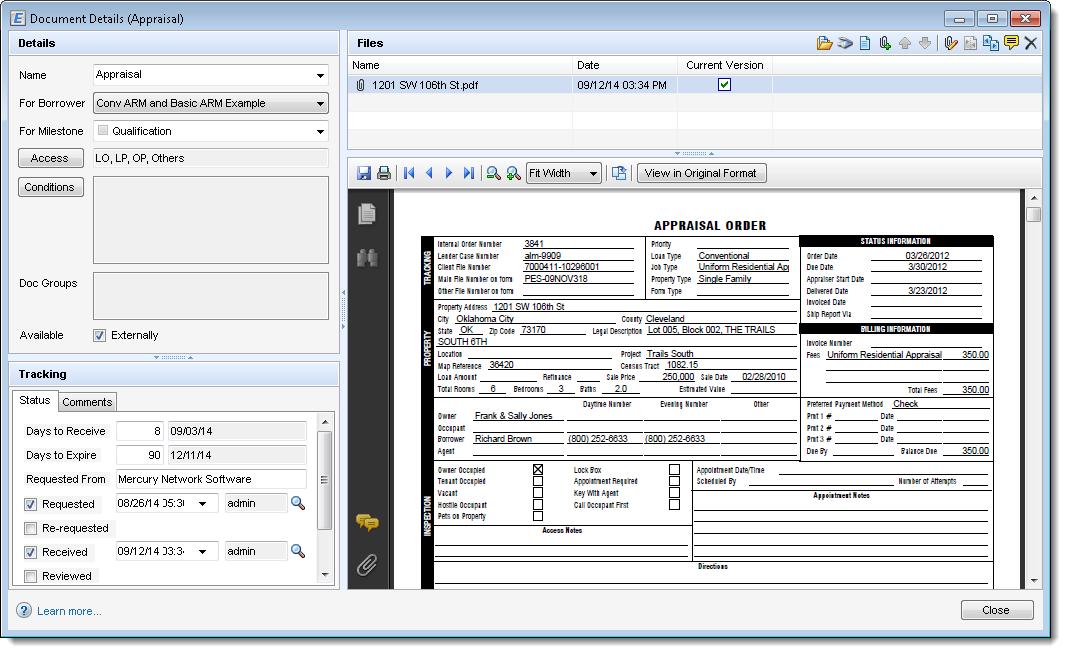
Retrieve report
When your appraisal is complete, the appraisal report and supporting documents can be pulled into your eFolder from the Check Status screen.
- With a loan file open, click the Services tab in the lower-left, and then click Order Appraisal.
- Once you've selected Mercury Network Software, click Next, and then click the Check Status tab, which will automatically pull in the appraisal and supporting documents.
- Once a completed appraisal report has been downloaded, it will be added into the eFolder automatically.
You can also import the appraisal by using the second approach outlined on the Check Status tab of this guide.
Deliver via SureReceipts
Here's how to securely deliver the appraisal to the borrower directly from Encompass using SureReceipts:
- With a loan file opened, click the Services tab in the lower-left corner, then click Order Appraisal.
- Select Mercury Network Software then click Next.
- Click the Check Status tab.
- Click Update Status in the bottom-left.
- In the Update Status window, choose Delivery via SureReceipts in the Status drop-down.
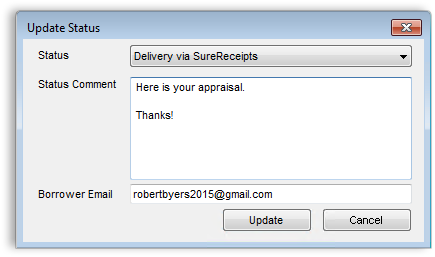
- In the Status Comment field, enter a message to be included in the email that will be sent to the borrower.
- Enter the email address for the borrower in the Borrower Email field.
- Click Update to submit the status and deliver the report via SureReceipts.
Doc Details
Guide for Mercury Network's Integration with Encompass
- Document 9706
- Revised: 11/02/2021
The Big Picture
This document shows you how to configure and use Mercury Network inside Encompass.