Guide for Mercury Network's Integration with Mortgage Builder
If you're using Mortgage Builder and Mercury Network, this integration helps you save time and reduce errors by eliminating repetitive data entry and consolidating status tracking. Plus, you can leverage Mercury Network's efficiency-driving automations while keeping your workflow inside the LOS platform you trust from Mortgage Builder.
To use the integration to save time and reduce errors, you'll need a Mercury Network account with a VMP XSite. It's free and easy to set up, so call 1‑800‑434‑7260 to get everything you need.
When you're ready, your Mortgage Builder Admin user will need to configure a few settings, so start with the "Configure Settings" tab below.
Configure Mortgage Builder
- The first step in using the Mercury Network Interface is to complete the initial administration setup. Under Administration, go to System Administration > Interface Settings and the following screen will appear.
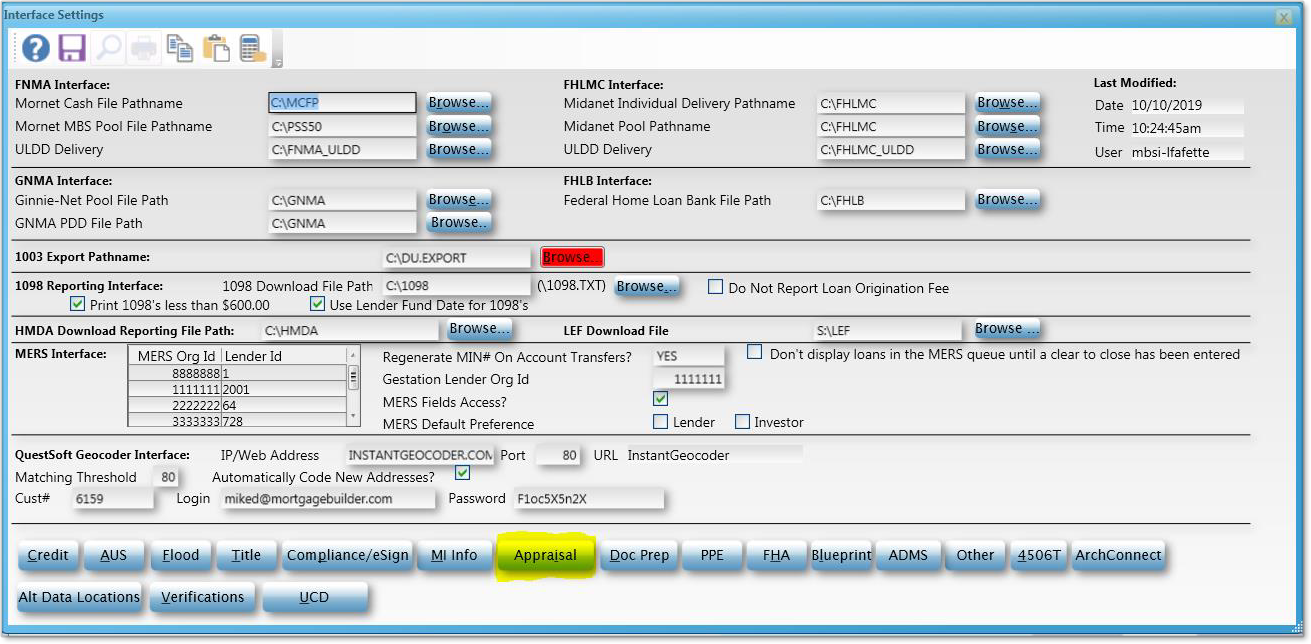
- Access the Appraisal button at the bottom of the screen in order to enter the information necessary for the appraisal integration.
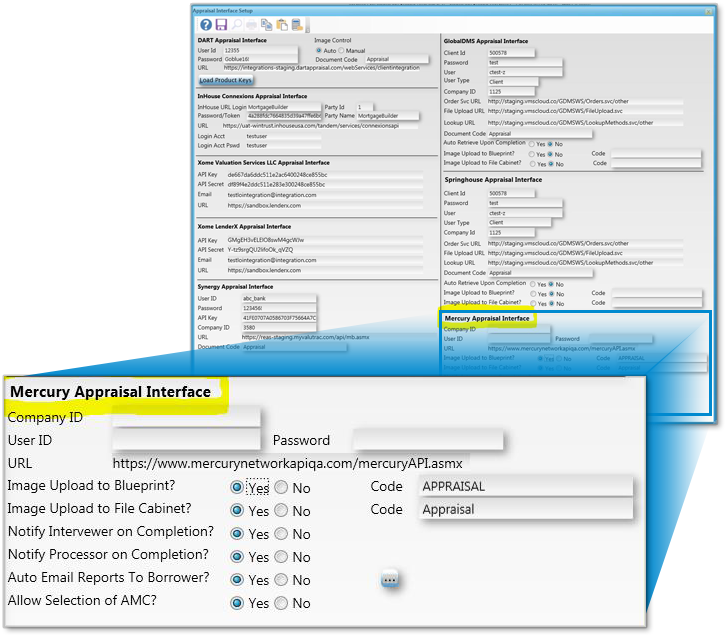
- Company ID:
Enter your Company ID that was provided by Mercury Network. If you have different company IDs with this vendor, you will be able to enter them on an individual user basis as well, explained further down in this documentation. The integration will look to the individual user first for a company ID, if blank on the user level, the one entered here will be used. - User ID:
Enter the User ID that was provided by Mercury Network. If you have different IDS for each of your users, you will be able to enter them for each individual user. The integration will look to the individual user first for the User ID, if blank on the user level, the one entered here will be used. - Password:
Enter the Password that was provided by Mercury Network. If you have different passwords for each of your users, you will be able to enter them for each individual user. The integration will look to the individual user first for the Password, if blank on the user level, the one entered here will be used. - URL:
The URL that the system is using for the integration will display here. This URL is https://www.mercurynetworkapi.com/mercuryAPI.asmx - Image Upload to Blueprint?:
Indicate if you wish to have the system automatically upload all PDFS returned thru the integration to Blueprint
- Code:
Enter the Blueprint Code that the PDFs will be uploaded under.
- Image Upload to File Cabinet?:
Indicate if you wish to have the system automatically upload all PDFs returned thru the integration to the Image File Cabinet.
- Code:
Enter the Image File Cabinet code that the PDFS will be uploaded under.
- Notify Interviewer on Completion?:
Indicate if you wish to have the Interviewer on the loan informed by email of all status updates and reports returned.
- Notify Processor on Completion?:
Indicate if you wish to have the Processor on the loan informed by email of all status updates and reports returned
- Auto Email Reports to Borrower?:
Indicate if you wish to have the Appraisal Report returned automatically emailed to the main borrower on the loan. Please note that Mercury Network also offers this functionality.
- … (ellipsis) button:
Access this ellipsis button to enter the subject and body text for the email to be sent to the borrower.- Subject:
Enter the Text for the subject line of the email.
- Body:
Enter the text for the body of the email to the borrower.
- Subject:
- Allow Selection of AMC?:
Indicate if you wish for the user to be able to select the AMC they wish to use when ordering the Appraisal on the loan.
- Company ID:
Set up users
- To setup the credentials for individual users for this interface, access Administration > Security > MB User Setup. The following screen will appear:
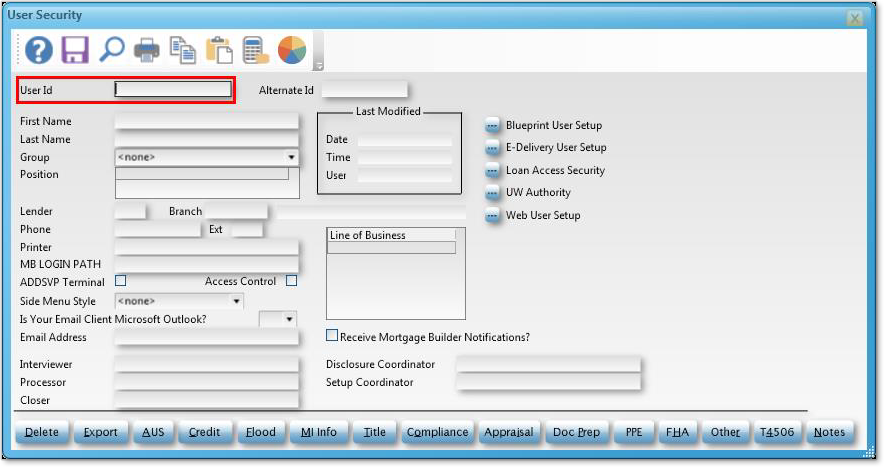
- User ID:
Select the user you wish to set up to for the Mercury Network interface.
- User ID:
- Click the Appraisal tab on the bottom of this screen to access the User Security sub-screen for Appraisal Interfaces.

- User ID:
If this user has a different Mercury User ID than what is setup in Interface Settings, enter it here and it will be used when submitting loans thru the integration.
- Password:
If this user has a different Mercury Password than what is setup in Interface Settings, enter it here and it will be used when submitting loans thru the integration.
- Company ID:
If this user has a different Mercury Company ID than what is setup in Interface Settings, enter it here and it will be used when submitting loans thru the integration.
- User ID:
- Click Save.
Order an appraisal
- The Mercury Network Interface Submit Request screen is available through the following paths:
- Origination → Processing → Orders/Requests → Appraisal Interfaces → Mercury Network Appraisal → Submit Request
OR
Interfaces → Appraisal Interfaces → Mercury Network Appraisal → Submit Request
- Origination → Processing → Orders/Requests → Appraisal Interfaces → Mercury Network Appraisal → Submit Request

- Appraisal Action:
The user will select the action they are performing on this loan. To place a new order, select NO (New Order). - Client ID:
This field displays the client ID associated with the user accessing the Mercury Submit Request screen. If multiple client IDS are associated with the user, they can access this field and select the ID they wish to use for this request.
- Product Type:
The user will select the type of product they are ordering. A lookup of valid choices is available based on your Company setup with Mercury Network. This must be completed when submitting a New Order request. - Payment Type:
Select how the payment for the order is to be made. Available options are:- CC - Credit Card
- CH - Check
- CO - C.O.D.
- MO - Money Order
- N30 - Net 30
- PP - Paypal
- Credit Card Info
If Credit Card is selected as the Payment Type, the user must access the Credit Card Info subscreen to complete the credit card info. Access to the Credit Card Info subscreen is only allowed if the Payment Type selected is Credit Card. After the order is placed, the credit card information entered in the subscreen will be removed from the loan data as we do not store this information in our data base. It will only be sent in the XML file and then deleted. - Appraisal Due Date:
Indicate the date you wish to have the report completed by. This is a required field for a new order submission. - Rush Order:
Check this box if the order is to be rushed.
- Selected AMC:
Access to this field is only allowed if the Admin setting allows a user to select the AMC they wish to use for this order. A lookup option will be available for AMCs assigned to your company.
- Comments:
The user can add comments to the order by selecting the Comments button before submitting the order.
- Appraisal Action:
When the order is successfully placed, Mortgage Builder will return a pop-up message with the order #.
The order # and latest status of the order will appear in the order history box, displaying the Order ID, Product Type, and Status.
Check status
- When in the loan, select the appropriate order in the order history box and then select View messages to view any messages that have been sent on the order.
- The current status of the order will be displayed in the Order History box, under the status column.
- The View messages window displays the majority of the order's status history.. If the status came over with a “status comment”, it will be populated in the messages history. It will be useful for any user who is checking the status of an order, to go ahead and pull the messages as well.
- For example, if the AMC sends an Order Changed event to Mortgage Builder, the status that will appear in the order history box will be Order Changed, and the details of those changes will be written out to the messages box.
Update status
- When in the loan, select the appropriate order, select a status to be sent from the Appraisal action drop-down list.
- There is also an option to send a message with a status. After the status is selected from the list, the user will add comments, save, and then select Submit.
- If the submission is successful, there will be a pop-up window that notifies the user that the status update was successful.
Send docs
When in the loan, select the appropriate order, choose Submit document from the Appraisal Action drop-down list, upload the file, and choose the file type. Always be sure to select the appropriate order that you intend to take action on, and then click Submit.
Retrieve report
- When an order is placed from Mortgage Builder, you'll see order in the Order history window. The order will also appear in Document tracking. The date that the order was created is stored here and when the completed appraisal is submitted, a date is stored.
- When the completed status and appraisal report are sent, the Completed status is shown on in the Order history window.
- To retrieve the report(s), the user will need to move to the View reports folder on the left.
- A new window will open to display a list of available orders (provided there is more than on order on a loan. There, you can select the appropriate order and click View Report to open the PDF.
Doc Details
Guide for Mercury Network's Integration with Mortgage Builder
- Document 9705
The Big Picture
This document shows you how to configure and use Mercury Network inside Mortgage Builder.