Guide for Mercury Network's Integration with PathSoftware
If you're using PathSoftware™, you can easily place and manage Mercury Network appraisal orders directly in your LOS. It's easy to use, and is a completely free part of the Mercury services you already use.
To use this integration, you'll need a Mercury Network account with a VMP XSite. It's free and easy to set up, so call 1‑800‑434‑7260 to get everything you need.
Use the tabs below to find the information you need.
Before you start using Mercucry Network's integration with PathSoftware to place and manage orders, you'll need to request some information from us. It's easy: Just send an email to IntegrationSupport@MercuryVMP.com to let us know you're setting up your PathSoftware integration. Be sure to include your Mercury Network customer number so we can get back to you quickly with this information. If you don't know your customer number, just be sure to include your Mercury Network username, and we'll be able to help you.
- Log into Path®.
- Open an existing loan file, create a new one, or import a Fannie Mae (.FNM) or Point borrower (.BRW) file..
- Select Interfaces from the Activity menu and click Appraisal.
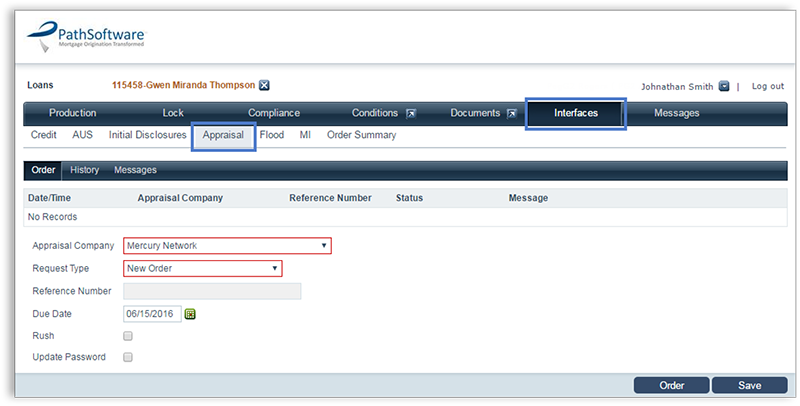
- Select Mercury Network from the Appraisal Company dropdown list.
- Select New Order from the Request Type dropdown list.
- Enter the due date for the appraisal in the Due Date field.
- Click Order at the bottom of the screen.
The Mercury Network Login light box is displayed.
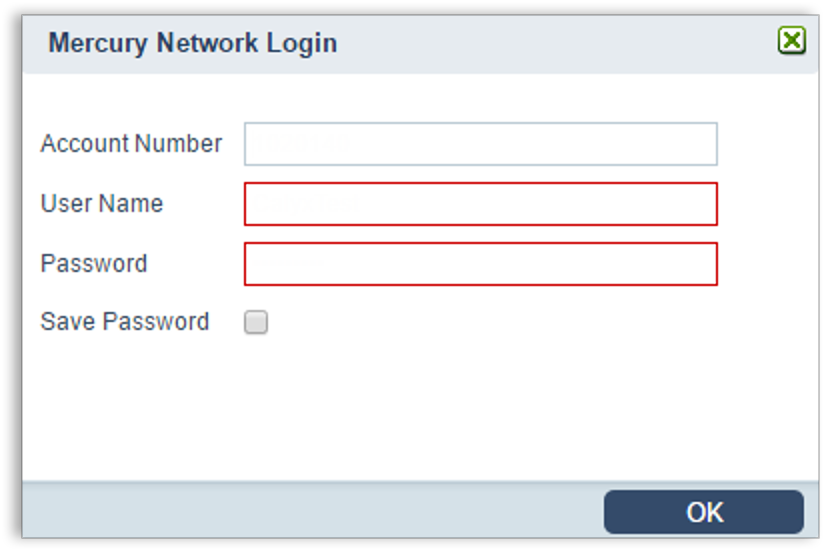
- Enter the Network ID you received from Mercury Network's Integrations Team in the Account Number field. This number is retained for subsequent requests.
- Enter your VMP Client Portal username in the User Name field. This is the username you use to log in to the VMP XSite.
- Enter your VMP Client Portal password in the Password field. This is the password you use to log in to the VMP XSite.
- Select the Save Password check box to retain the User Name and Password for subsequent requests.
- Click OK.
The Mercury Network Information light box is displayed.
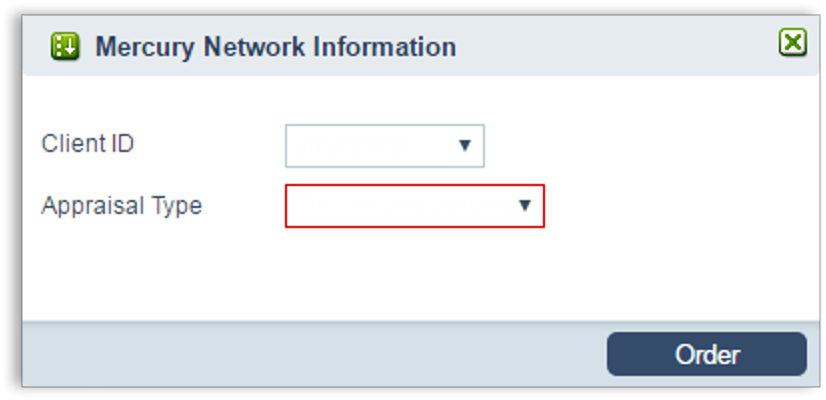
- Select the name of the Mercury Network Client Group where this order should be assigned from the Client ID dropdown list.
- Select the type of appraisal to order from the Appraisal Type dropdown list.
- Click Order.
A message is displayed at the bottom of the screen ot indicate the order was successfully placed.
To check the status of your order:
- Log in to Path® and open the loan for which you are checking the status.
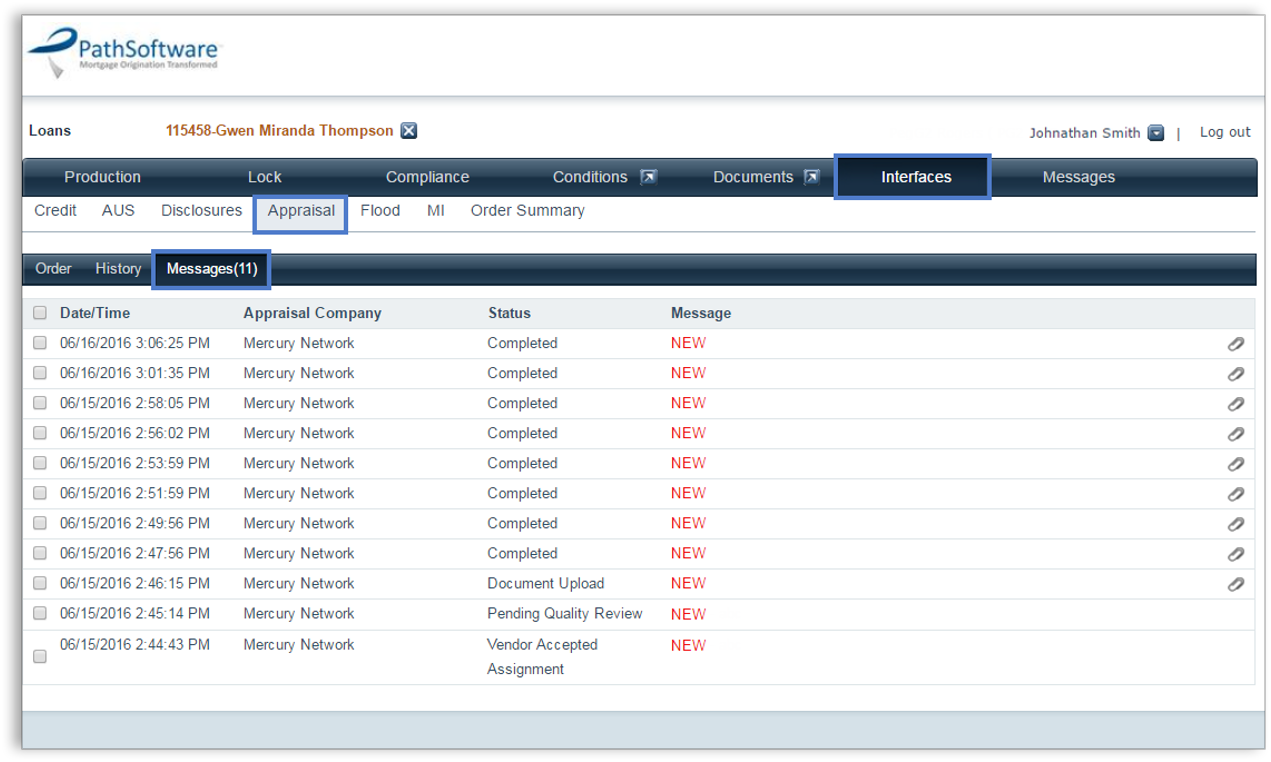
- Select Interfaces from the Activity menu and click Appraisal.
- Click the Messages tab. The Messages tab contains status updates received from Mercury Network regarding your order. By default, these status events are sorted in reverse chronological order so the latest, current status is at the top. A paper clip icon on the far right indicates that the appraisal was performed and an appraisal document was received.
- Click the History tab to view status updates, documents, and messages that were sent from Path to Mercury Network about this order.
To change the status of an order:
- Log in to Path® and open the loan for which you are updating the status.
- Select Interfaces from the Activity menu and click Appraisal.
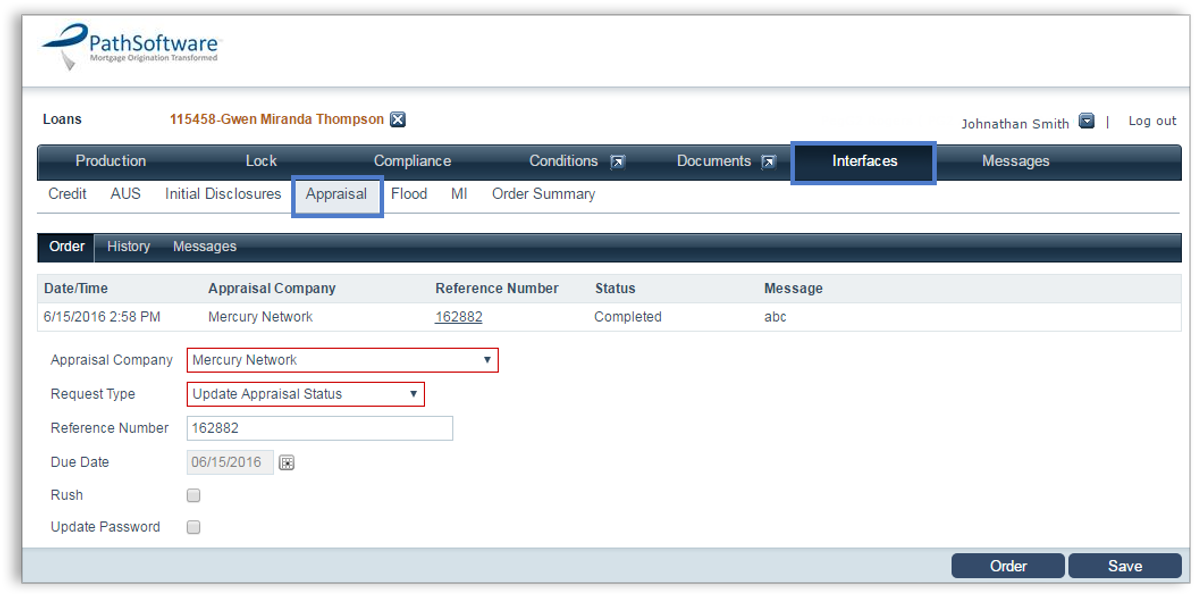
- Select Update Appraisal Status from the Request Type dropdown list.
- Click the Order button.
The Mercury Network Login light box is displayed.
- Enter your login information and click OK, or if the information is already populated, click OK.
The Mercury Network Update light box is displayed.
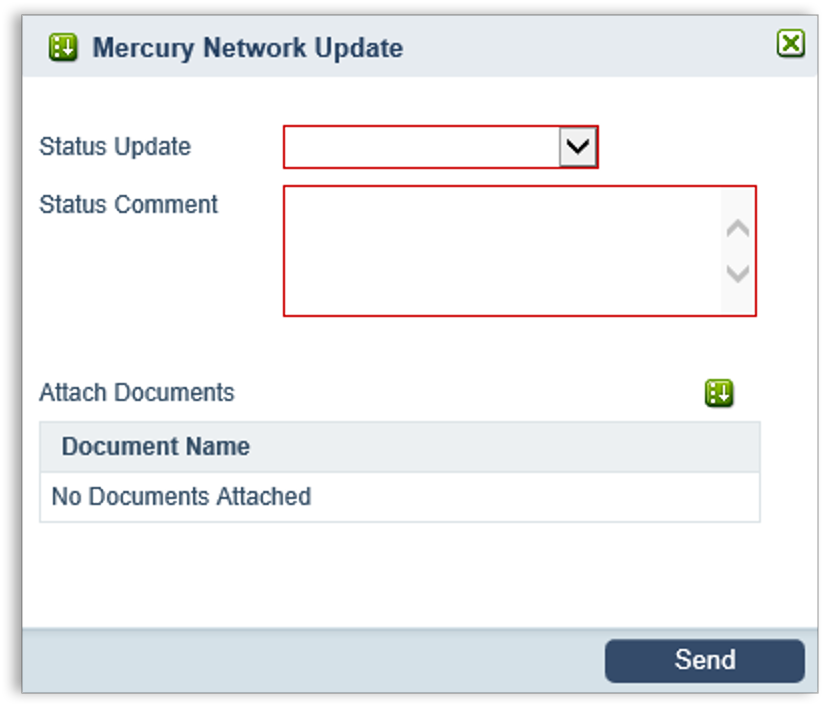
- Select the new status from the Status Update dropdown list from the Mercury Network Update light box.
- Enter any comments to include with the status update in the Status Comment field.
- To attach a document to this status update, click the green Select icon to the right of Attach Documents to open the Document Management List light box.
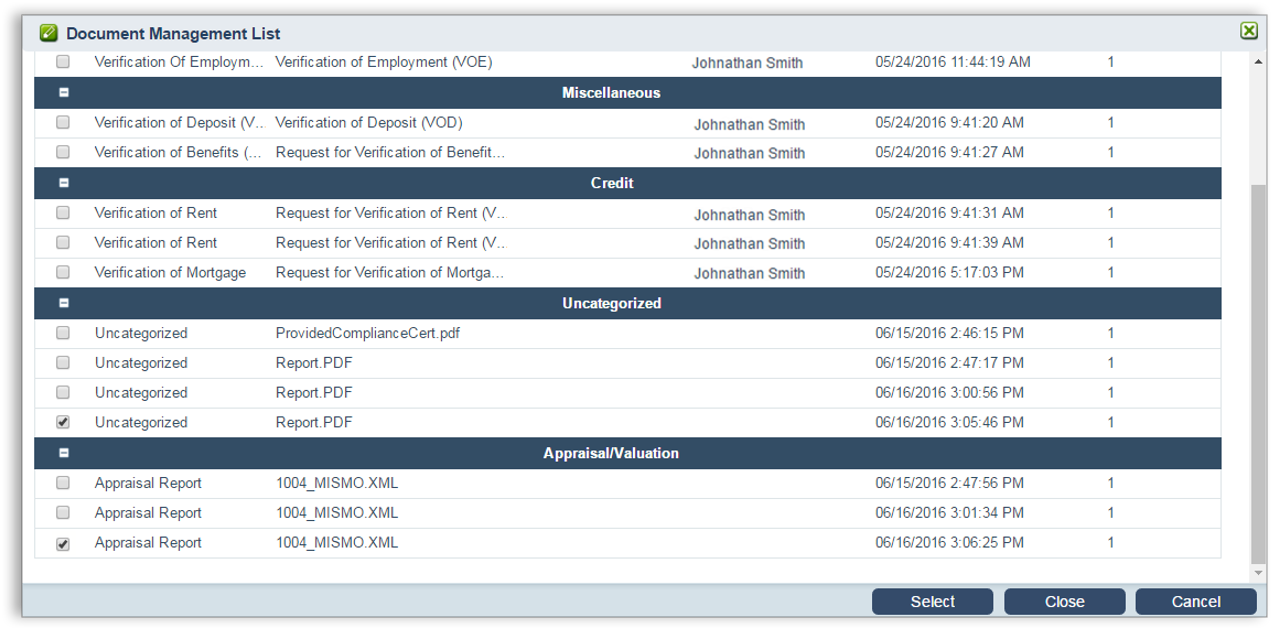
In the Document Management List that is displayed, documents that are currently stored in the document repository for this loan are listed. - Select the check boxes that correspond to the documents to include and click the Select button.
- In the Mercury Network Update light box, verify the information and click Send.
A message is displayed at the bottom of the screen to indicate the status was successfully updated.
In addition to including documents when placing an order, you can also attach any document already stored in the Path® document repository to an existing order.
To upload a document:
- Log in to Path and open the loan that requires an attachment.
- Select Interfaces from the Activity menu and click Appraisal.
- Select Update Appraisal Status from the Request Type dropdown list.
- Click Order.
The Mercury Network Login light box is displayed.
- Enter your login information and click OK, or if the information is already populated, click OK.
The Mercury Network Update light box is displayed.
- Select Document Upload from the Status Update dropdown list.
- Enter any comments to include with the status update in the Status Comment field.
- Click the green Select icon to the right of Attach Documents. The documents currently stored in the document repository are displayed in the Document Management List. Select the check boxes that correspond to the documents to include and click Select.
- Verify the information in the Mercury Network Update light box and click Send.
When the document is successfully sent, a confirmation message is displayed.
When your appraisal is complete, you can view the report in Path®, send it to other parties, or download a copy to use on your computer.
- Log in to Path and open the loan with the completed report.
- Select Documents from the Activity menu.
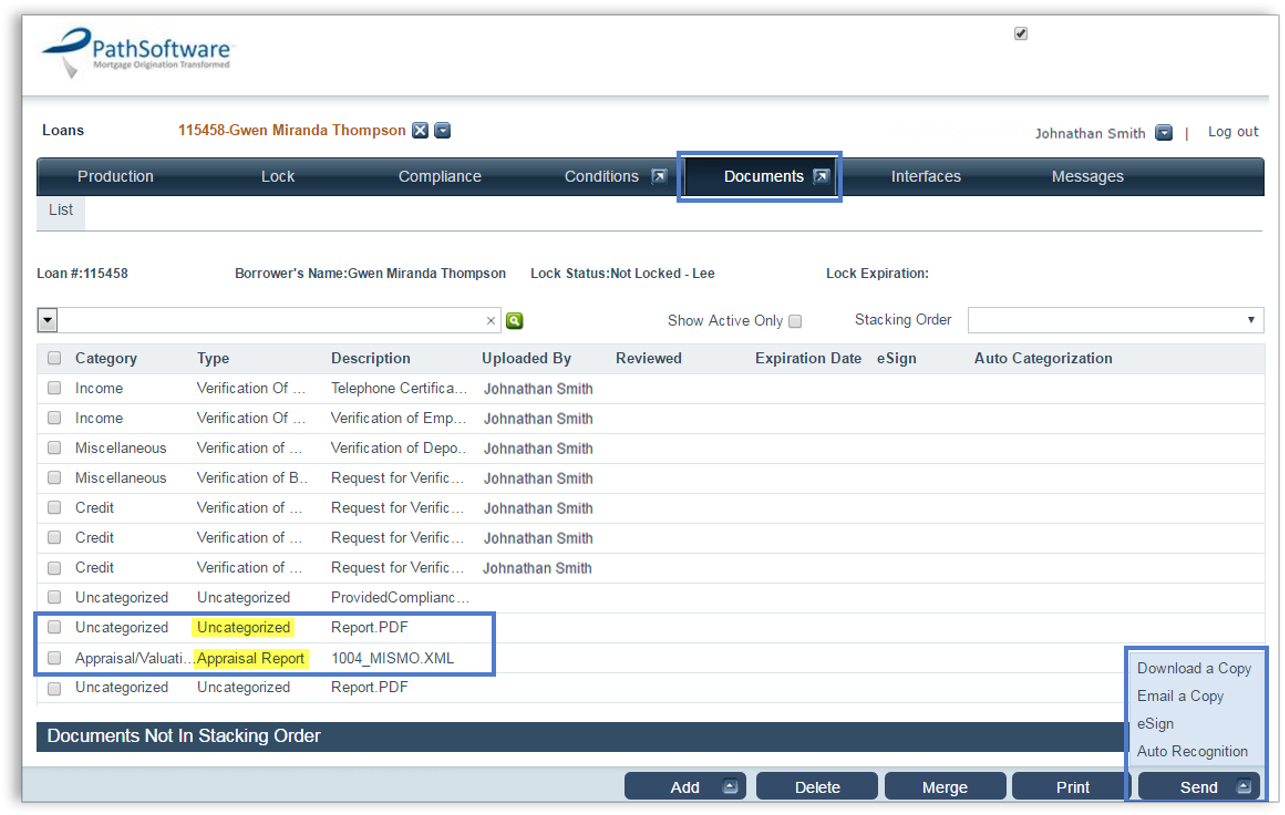
- In the document list, look for the item with Appraisal Report in the Type column. This is the MISMO XML version of the report. The uncategorized item with the Report.PDF description, is the PDF version of the report. You can click either version to open the report Quick View. Click the Detail button at the bottom of the Quick View screen to view the full report.
- Select the check boxes that correspond to the reports you want to send and click Send. A menu pops up to specify what to do with the files. Select Download a Copy to store the document on your computer or Email a Copy to deliver the report via email.
Keep in mind: If you have Mercury configured to automatically deliver the report to the borrower, you don't need to send it this way in Path.
You can also click the Print button to open a printable view of the report.
Doc Details
Guide for Mercury Network's Integration with PathSoftware
- Document 9707
- Revised: 06/27/2016
The Big Picture
This document shows you how to configure and use Mercury Network within PathSoftware.