How to configure and use RealView Bridge
How to configure and use RealView Bridge
RealView Bridge is a tool which helps reduce revision requests and improves your QC process speed and efficiency.
RealView Bridge analyzes an appraisal during delivery and gives the appraiser a list of any issues based on a set of customizable rules which you control. The appraiser can make changes or provide explanations for any items on the checklist before they deliver the report. This way, flagged issues are addressed before your QC team begins reviewing the appraisal.
Use the panels below to learn how to configure and use RealView Bridge:
Enable RealView Bridge Globally
You'll first need to turn on RealView Bridge globally within Mercury Network.
If you'd rather be more selective about which orders will use RealView, you can skip this step then enable RealView for Client Groups (see that section below.)
- Log into https://secure.mercuryvmp.com/ with your account credentials.
- Click Preferences at the top and select AQM Settings.
- Click Enable RealView Bridge checkbox under RealView.

- Click Save.
Configure checklist rules for RealView Bridge
Now, you'll need to enable the RealView Bridge checklist rules which will be run on the appraisal when it's delivered.
- Log into https://www.platdata.com/ with your Account Admin credentials.
- Click the Checklist Admin tab on the left.
- Click the Edit link next to the ruleset named RealView Bridge.
Avoid changing the ruleset name because it is specific to RealView Bridge.
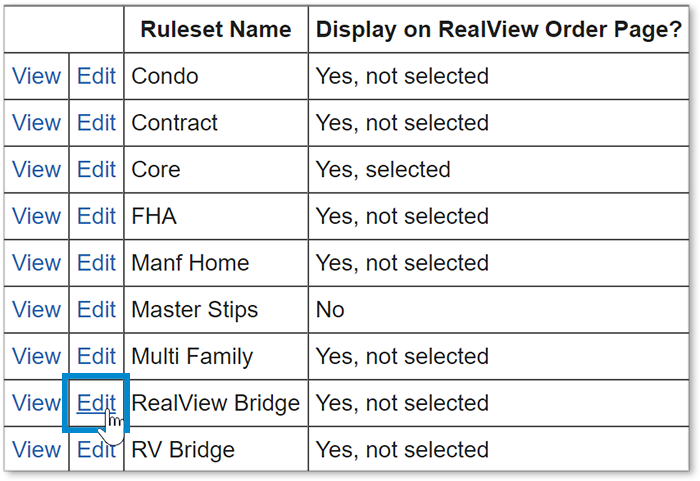
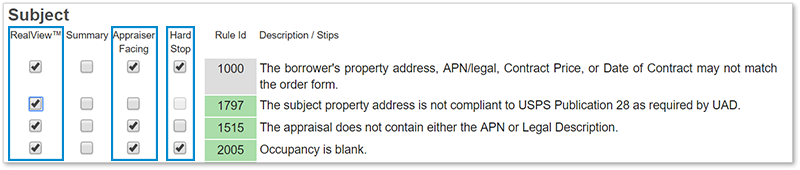
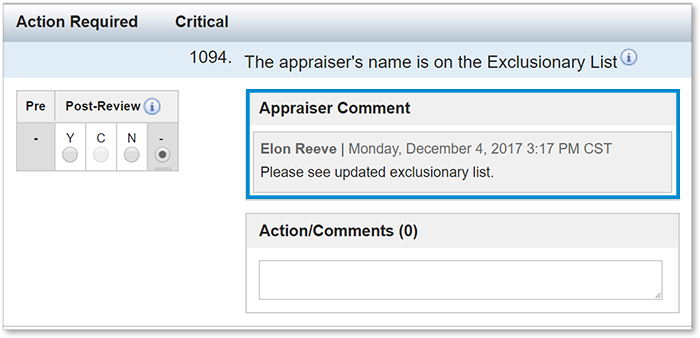
- Select which rules to use in RealView Bridge. The rules selected must exist in another ruleset you currently use in order for appraiser comments to appear within RealView.
- Enable the checkbox field in the RealView column.
- To have a rule appear in RealView Bridge, enable the checkbox field in the Appraiser Facing column.
- To make a rule a hard stop, enable the checkbox field in the Hard Stop field.
- Rules marked as Appraiser Facing but not Hard Stop will appear in RealView Bridge as a warning and are not required to be overridden by the appraiser.
- Click Save.
Place an order with RealView Bridge enabled
- Return to Mercury Network.
- Place a new order as you normally would.
- On the confirmation screen, notice you can turn Require RealView Bridge on or off on a per-order basis. If enabled globally or for this Client Group, it will be on.
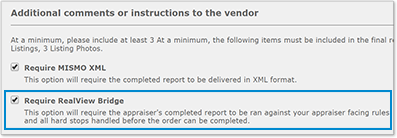
- On the confirmation screen, notice you can turn Require RealView Bridge on or off on a per-order basis. If enabled globally or for this Client Group, it will be on.
Run RealView to see the appraiser's comments
Once an order has been completed, to see appraiser comments you need to run RealView on the appraisal.
- Open an order which has been delivered by the appraiser which also had RealView Bridge enabled.
- Click Start AQM and choose RealView.
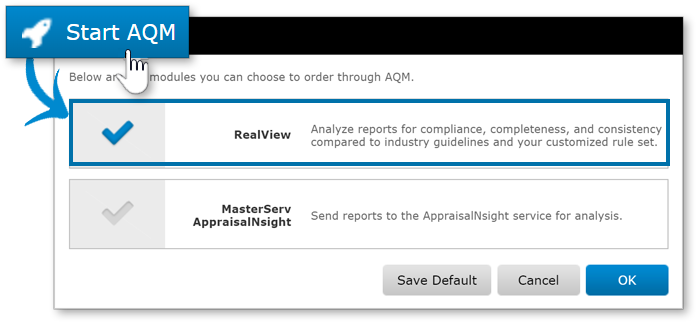
- When RealView is complete, you'll see a new item in the audit trail which contains a link to the report so you can access it.
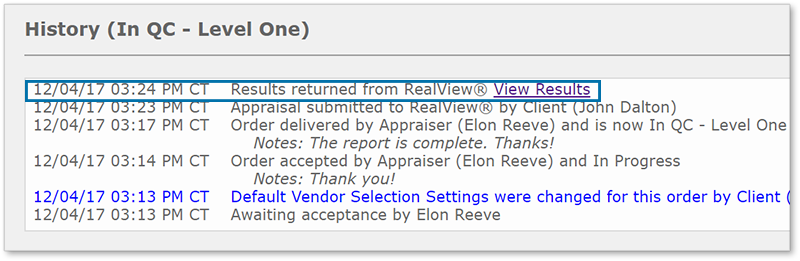
- Based on the ruleset used to run RealView, in the Appraisal Review Checklist section, you'll see appraiser comments for any fields which had rules triggered by the report.
Enable RealView Bridge for Client Groups
To use RealView Bridge more selectively, you can enable it for a Client Group within Mercury.
- Log into Mercury.
- Click Clients at the top.
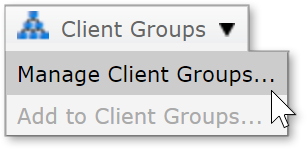
- Click Client Groups, then select Manage Client Groups.
- Click the group you'd like to edit, then click Edit Group.
- Go to the AQM tab and check Enable RealView Bridge in the RealView section.
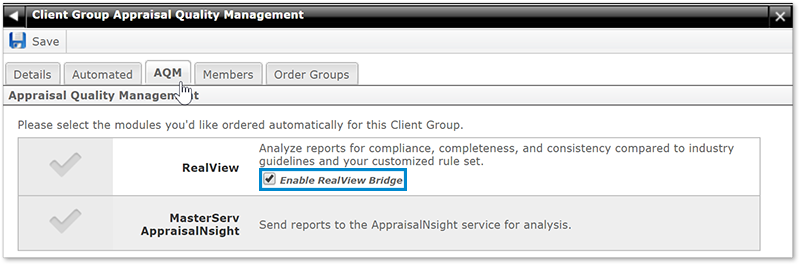
- Click Save.
Doc Details
- How to configure and use
RealView Bridge - Document 9731
- Revised: 12/04/2017
The Big Picture
This document shows you how to configure and use RealView Bridge in Mercury Network.