Configure Automatic Settings |
||
A VMP XSite can be configured to automatically assign orders and create invoices for new orders based on your preferences. These preferences can either be set globally for all VMP XSite orders, or for specific Client Groups.
Global settings will apply to all VMP XSite orders — including all those placed by clients already in a Client Group. Then, you can change the automatic invoice settings for each Client Group specifically.
To access automatic settings
- Log into your Mercury Network profile here.
- At the top, click Preferences and choose VMP XSites.
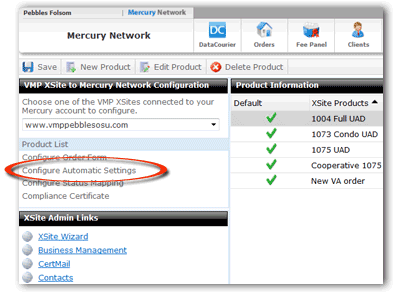
- On the left, select Configure Automatic Settings.

- At the top of the Automatic settings are the Automatic Assignment
Settings. These settings dictate how order assignment behaves
when Unattended Order Assignment is enabled, and you can configure
appraiser/agent options separately from AMC/Firm options.
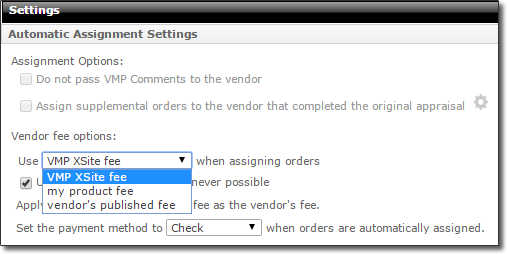
- In the Assignment Options, choose whether or not you want to pass VMP comments to the vendor and/or assign supplemental orders to the same vendor that completed the original order.
- In the Vendor fee options, choose the default fee table
to use when assigning orders. You have the following three options: VMP
XSite fee, My product fee, or the Vendor's published fee.

Check the box below it to use vendor override fee whenever possible. If you choose to use your VMP XSite fee when assigning orders, you can apply a percentage of that fee as your vendor's fee.
You can elect to use the vendor's published fee when an order is being automatically reassigned.
You can also set the default payment method when orders are automatically assigned.

- Below the Automatic Assignment Settings are the Automatic Invoice
Settings.

Here's what the settings do:
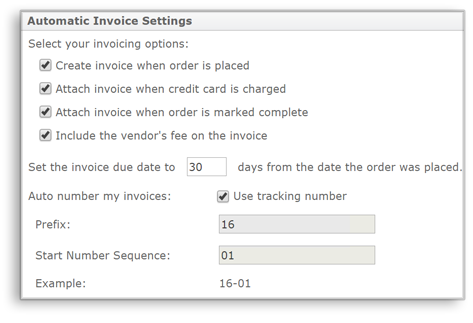
- Select Create invoice when order is placed if an invoice should automatically be created when a new order is placed on the VMP XSite.
- Select Attach invoice when credit card is charged to automatically attach the invoice to the order when the credit card has been charged.
- Select Attach invoice when order is marked complete to automatically attach the invoice to the order when the order has been marked complete.
- Select Include the vendor's fee on the invoice to automatically populate the vendor's fee to the VMP XSite invoice.
- Enter a number of days from which the order was placed to be used as the due date for the invoice.
- Use the Auto number my invoices section to set the
numbering prefix and the starting number for the sequence.
- Select Use tracking number to use the XSite tracking number as the invoice number when the invoice is automatically created.
- Enter a Prefix and Start Number Sequence for more detailed control over invoice numbers.
- In the Automatic Order Settings section, there are a few
options:

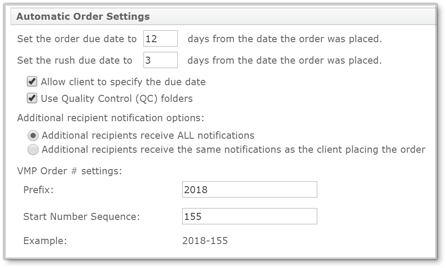
- Enter a number in Set the order due date to XX days from the date the order was placed. This automatically sets the due date for VMP XSite orders. Note that these are business days - excluding weekends and major holidays.
- Enter a number in Set the rush due date to XX days from the date the order was placed. This automatically sets a faster turnaround time for any orders marked as Rush Orders.
- Check Allow client to specify the due date if you'd like your VMP XSite clients to be able to specify the due date for their orders. Again, these are business days - excluding weekends and major holidays.
- Select Additional recipients receive ALL notifications if you want all order notifications to be sent to email addresses entered in the Additional recipients field on the client's order form. This is the default setting.
- Select Additional recipients receive the same notifications as the client placing the order if you want the same notifications the client recieves to be sent to the email addresses entered in the Additional recipients field on the client's order form.
- Check the Use Quality Control (QC) folders option if you wish orders from this client to use the detailed quality control order statuses and folders. If unchecked, orders will go straight to completed status when the appraisal is delivered by the vendor.
- In the VMP Order # settings section, enter a prefix and a starting number to automatically be used when new VMP XSite orders are created.
|
||||
Mercury
Network and its products are trademarks |