Creating and Editing Contacts |
||
For each individual who will order appraisals on your client portal, you'll need to create a contact. To create a contact...
- Access the Clients view in Mercury Network.
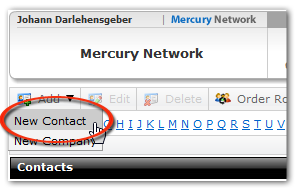
- Click Add then choose New Contact.

- In the Contact Details window that appears, you'll find
many options for creating the new contact. Many of these are self-explanatory,
but there are a few options that require extra attention:
- By default, the contact will be set as Shared so it will be visible to other authorized Mercury Network users. Un-check this box to restrict visibility of this company to the current Mercury Network user only. Generally, you'll want the contact to be shared.
- A contact would only be marked as ad hoc if it is not meant to be a permanent contact. Typically, you will not want to mark a contact as ad hoc.
- Mark the Type of Contact that best describes the contact. If you will assign this contact to a company, the contact will always inherit the contact type of the company.
- Using the Assign to Co. drop-down, you can assign this contact to any existing company in your Mercury Network contacts. If you've assigned the contact to a company, you can mark the Use company address option to fill the company's address info for this contact.
- Depending on the Type of Contact you selected, there will
be some additional info to enter:
- If you selected Appraiser, you'll have the option to
associate this contact with a user on your XSite using the XSite
User drop-down box. You'll also have the option to enter the
appraiser's license information.

- If you selected Client and/or Lender,
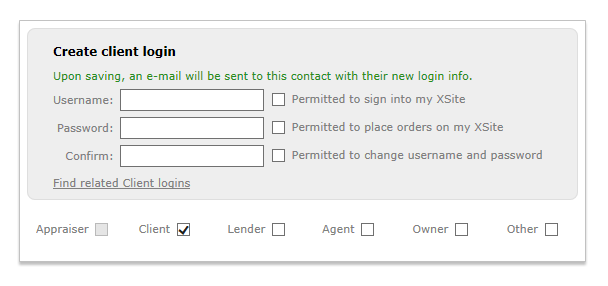
you'll see the XSite Login section on the right. Here, you
can check the box to Allow this contact to log in and view orders
they've placed. In order to do so, they'll need a
Username (their email address) and
Password which must be a strong
password. You can create this username and password for them by entering
the information in the fields provided. After you save the contact, their
login info will be sent to the e-mail address you entered for the contact.
After that, they'll be able to retrieve and/or change their password if
necessary, as long as they have the correct permissions (see below).


Note: The username and password you create here can be used on any client portal- not just yours. So, this information must be unique. Click the Find related Client logins link to locate an existing login that may already be in place for this contact.
- After the login has been created for a contact, the available contact
information for the client is displayed, followed by three options:
- Permitted access to ALL XSite orders: This "admin" permission
allows the user to view and manage all orders which have been placed via
the client portal.
- Required to use client groups when available: Check this if
the user with the "admin" permission should be required to use client
groups when placing new orders. If un-checked, the user will be able to
place orders in any client group, or with no client group.
- Permitted to sign into my XSite: This allows the user to log
in to your client portal. If this option is unchecked, the user cannot
log in and view orders.
- Permitted to place orders on my XSite: This option allows the
user to place new orders. If you only want to grant permission to view
orders, uncheck this box.
- Permitted to change username and password: This allows the
user to update their own login information. If you remove a user's
permission to change their own username and password, you'll see an
Edit login link appear in the Client login
information. Click that link to enter a new password for the user.
Note: When you enter a new password, be sure to communicate it
to the user because, for security purposes, the system will not send the
new login information automatically.

- If you selected Appraiser, you'll have the option to
associate this contact with a user on your XSite using the XSite
User drop-down box. You'll also have the option to enter the
appraiser's license information.
- Click Save in the upper left corner to commit any changes.
After a contact has been created, you can double-click it in the Clients view to edit it at any time. Alternately, you can select the contact in the list, then click Edit.
Mercury
Network and its products are trademarks |